Or at least many things you might not expect – from Realsimple.com.
The great potato experiment
Potatoes. A versatile food, one grown and eaten extensively by my ancestors on relatively small plots of land, but not so easy to grow on an urban plot of land. The vines tend to extend out, much like strawberries do. But there is a potential solution to this problem that I’m going to try, and that’s training the potatoes to use vertical spaces rather than horizontal.
Some people have planted potatoes in used tires. They put the largest tire down first, fill it with soil, add another and fill that with soil and potatoes, and then add more tires and soil as the potatoes flower and the vines grow. At a certain point, the potatoes are ready for harvest, and if treated properly will form a skin that allows them to be kept for about 6 months.
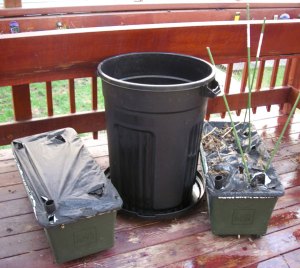
I’m doing something a little different because I want to grow them on my deck, as I don’t currently have space in my plant bed for tires. I’m going to try growing them in a 33 gallon garbage can and adding soil to it as the potato vines grow.
I was happy to find this black garbage can that was made in the USA with recycled materials. The black color will help it retain heat. It has two holes in the bottom along the outer edges for drainage purposes (I suggest using a drill), and I put one bag of soil in it. The garbage can cover serves as a saucer to catch drainage, and the currently unoccupied yet heavy Earth Boxes along with the deck planter behind it will help prevent strong winds from pushing it over. More on Earth Boxes in another post. In a few days, I will plant my potatoes in it.
I bought these seed potatoes from Seedsofchange.com and they were shipped after the danger of frost in my area had passed. They had already started sprouting, so I cut some of them up and I will let them form a scab over the next couple of days. This helps prevent rot. Potatoes do need water, but excessive water isn’t good for them. The parts I cut away will go into the compost bucket, and the sprouted potatoes I don’t have room for in the garbage can will go on freecycle.
I’ll post about their progress as it happens. If I can reuse the same garbage can and harvest new seed potatoes for next season, this will be fun, green, and cost-effective, all in a small space.
Making your own vanilla extract
Anyone who bakes uses vanilla extract sometimes, and the store-bought stuff is nice enough, but it does usually have some water and sugar or corn syrup in it. Wouldn’t it be nice to avoid additional sugary additives and to have vanilla extract that smells even better? Wouldn’t it also be nice to have some extra to turn into homemade gifts? Fortunately, even though it takes some time, it’s so easy to make your own vanilla extract.
What you’ll need:
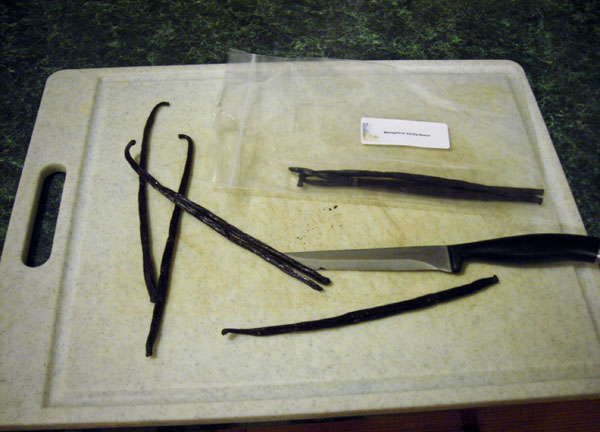
– 4 vanilla beans. I bought a 6-pack of Madagascar bourbon vanilla beans from The Kitchen Project for slightly less than $20 total, including shipping. If I were making a lot more, I could have saved by buying from their suppliers at vanilla.com in bulk. You can use Madagascar, Mexican planifolia, or Tahitian vanilla beans, whatever your preference might be, if you have one.
– A 750ml bottle of vodka. I went to the liquor warehouse and asked about the most neutral-tasting vodka brands. Then I chose one in my price range – i.e., not the bottle for $89. Mine cost closer to $21. You can use rum or brandy as well, but those will impart their own flavor and aren’t clear so you won’t be able to see progress, so I suggest that you use vodka at least for the first batch.
– two 32oz canning jars with lids
– a strainer
– approximately six 4oz amber bottles with screw-on lids
First order of business is preparing the vanilla beans. Take a moment to examine them. They should be moist, flexible, and slightly shiny with no hints of mold or crystals. If you find any mold on a bean, toss that one before it spreads to the others. And don’t miss out on that great vanilla bean smell. Vanilla is often code for plain or even boring, but vanilla beans actually have a complex scent that I personally think is just to die for, with hints of fruit notes, slightly woody notes, and even a bit of spice. Yum! Vanilla’s reputation as a boring flavor comes more from its ubiquity and from imitation vanilla than from the actual scent of the beans.
You’ll split each of the 4 beans lengthwise with a sharp, small or medium-sized knife. Leave the ends uncut so that each bean forms a very long V.
Add them to your canning jar and pour the vodka into the jar. Close the lid tightly, store the jar and the leftover beans in a cool, dark place away from direct light, and shake the jar several times a week until at least four weeks have passed. Six to eight weeks would be even better.
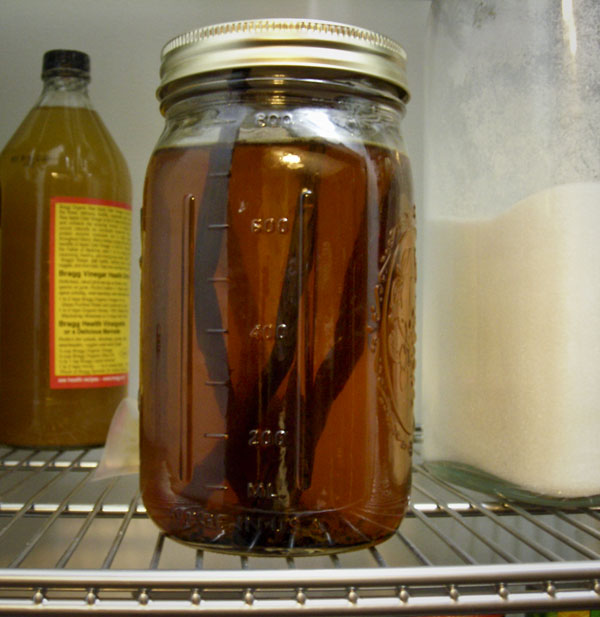
I started this batch about 10 days ago – and yes, that’s a bottle of Braggs Apple Cider Vinegar, in case anyone had any doubts as to my crunchy-granola tendencies. The extract is normally in the pantry as pictured but with the pantry light switched off and the door closed. You can see some vanilla bean sediment in the bottom if you look closely. I could leave that in, but for consistency in flavor, I will pour it through a strainer into another canning jar and then pour that into approximately six 4oz amber bottles with screw tops, which I will then store in a cool, dark place. How do I know it will be 6 bottles? Because 750ml of vodka is a little bit over 25 fluid oz, and 25/4 = a little bit more than 6. I may have about 2oz left over at that point. By the way, if you have more vodka to use than a 750ml bottle, you can go ahead and fill the canning jar up to 32oz and add one more split vanilla bean. Then you can probably make about seven 4oz amber bottles of vanilla extract.
This leaves us with some questions.
What do I do with the vanilla beans after they’re done? You can do several things. You can cut some up and put them in sugar for a couple of weeks to make vanilla sugar. You can use them at least one more time to make the same amount of extract. Or you can cut them up and place one piece in each of the amber bottles.
Is this cost-effective? It is if you use vanilla extract often or if you would like to give some away as gifts. Using what I paid for 4 vanilla beans, a 750ml bottle of vodka, two canning jars, and six 4oz amber bottles, I estimate each finished 4oz bottle will have cost me between $5 and $6. Since it costs about $8 for half as much store-brand vanilla extract that has water and corn syrup in it, I think you can make the argument that it’s cost-effective, as long as the extract is used. It’s in high-proof alcohol, so it will keep essentially forever.
Just don’t drink it straight. If you must indulge your inner lush, use rum or vodka to make vanilla cordial instead. You’ll thank me.
Composting
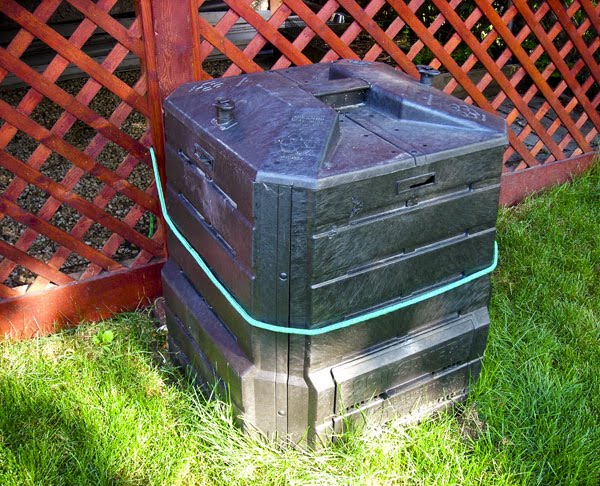
Composting, if you have a space for a pile or a bin, is easier – and less smelly – than you might think. I have a compost bin that lives on the ground up against the lattice work for the raised deck in the back yard:
Isn’t it lovely? I think so.
As you can see I have a bungee cord around it because I didn’t want the dog tipping it over. Dogs will eat compost and food on its way to becoming compost. And no one wants that. Well, except maybe the dog, but she doesn’t get a vote.
I discovered that the process is simpler than I thought, and the method in this house goes something like this: when we have food scraps, we put them in a compost bucket under the sink. Said food scraps can include peelings or stems or other inedible parts of fruits or veggies as well as food that’s about to go bad. I use this compost bucket from gaiam.com. It has a carbon filter at the top to prevent any smells, and I have to say it works well. I surely would hear about it a lot if it didn’t. All of this type of material is called green material, by the way, and we’ll get back to that later.
Once a week or so, we empty the bucket into the compost bin in the yard and dampen the contents with the garden hose. We’re aiming for the moisture level of a wrung-out sponge.
Just about all of our yard waste can go in there as well – fallen leaves, dead plants, clippings, small sticks, etc. Cardboard and shreddings from the paper shredder can go in also. I’d like to see an identity thief paw through sensitive, shredded financial information in a compost bin – talk about a disincentive, eh? Dried grass clippings can be used as well, but overdoing it leads to a stinky mess and our lawnmower is just a human-powered push mower, so we tend to leave the clippings on the lawn. I also avoid adding any seeds, weeds, or diseased plants as they will grow in your pile and possibly take it over. All of this type of material is known as brown material, and ideally you have a balance of green and brown. I don’t particularly worry about a balance myself as part of my goal is reducing waste and I don’t want to toss out one or the other in the name of balance, although I do know that better compost is made with a balance. I certainly make sure there’s enough brown material, as having too much green is what can lead to bad smells. You are letting food rot, after all. It’s not the prettiest process in the world.
Any material in there will compost faster if it’s not large but I tend to let large pieces such as corn cobs just do their thing. They get there eventually. I will also turn the compost as well, usually when I’m adding any material. You can buy a special tool for that, but I use the pitchfork the previous owners of the house kindly left in our yard instead. On occasion, I sprinkle in some compost activator although this is entirely optional, as the material will compost without it. It did speed up the initial process, however, and if you’re eager to have compost you can use, it’s a good way to go. So, in about two months after I first started this process, I had some nice black soil at the bottom, which I removed by opening the door at the bottom of the bin and shoveling it out. I can add it on top of the soil or mix it in; either way, the garden loves it.
Other people use a pile and occasionally build their own enclosure with 2x4s and wire. Some buy a bin you can spin, such as this one. It means you don’t have to use a tool to turn it, but they do tend to hold less than my bin. Some people, particularly those who are short on space, use vermicomposting with worms in small plastic bins. I don’t have any experience with that but it can be a great solution for an apartment dweller. Perhaps you should check your lease for a pet clause, just in case. 😉
You can compost things you might not have believed would compost. Used teabags and coffee grounds add a lot of nutrients to a compost pile or bin. But you can also add dryer lint (if your clothes are not made of synthetic fibers) and clean hair clippings or those pet hair tumbleweeds you find in your house. Or maybe that’s just our house. Anyway, here is an interesting list of uncommon items you can add to a compost bin.
But what should you NOT add? You shouldn’t add meat, dairy, eggs (though the shells are fine), or oily/fatty foods. Meat, dairy, and eggs attract rodents and oily foods slow the process down too much. You also shouldn’t add any excrement from predators, including your dog or your cat. Or yourself, even if you’re vegetarian. 😉 If you have rabbits or herbivore-only chickens, theirs is probably okay to add. But meat eaters and vegetarian humans can carry pathogens and the heat from the compost process may not kill those pathogens.
We don’t eat much meat in this house, but we do have dairy and eggs and food cooked in oil. My next experiment will probably come from trying an air-tight Bokashi All-Food composter. You can put any food at all in that, but it doesn’t finish it and produce actual compost. It produces pickled remains that you can bury in your compost pile or bin and an acidic liquid that you must periodically drain out. You can use the liquid to clear out your drains or dilute it heavily (a ratio of about 100:1 water to bokashi liquid) to fertilize your plants. I’ll certainly update after I’ve seen the results. If I can get it to work, it would potentially mean throwing out zero food scraps, and that to me is a worthy goal.
And if you prefer a visual guide, here’s a youtube video from the head gardener at Oak Park’s own Cheney Mansion. It really shows you how easy this can be, more so than a list of steps. Happy composting!
[youtube=http://www.youtube.com/watch?v=5IZp5EsHAW4&hl=en_US&fs=1&]

